


Writing PLI application: The example that we saw was too basic and is no good for any practical purpose. Let's consider our infamous counter example and write the DUT reference model and Checker in C and link that to the Verilog Testbench.
First let's list out the requirements for writing a C model using PLI.
- Means to call the C model, whenever there is a change in input signals (Could be wire or reg or types).
- Means to get the changing signals (or any other signal) value in Verilog code into the C code.
- Means to drive any signal value inside Verilog code from C code.
There is a set of routines (functions) that Verilog PLI provides which satisfy the above requirements.
PLI Application Specification.
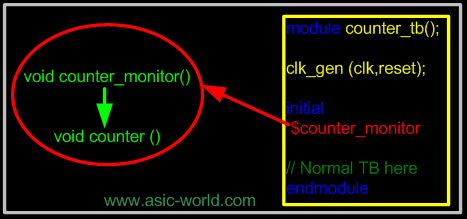
Let's define the requirements for our infamous counter testbench using PLI. We will call our PLI function as $counter_monitor.
- Implements Counter logic in C.
- Implements Checker logic in C.
- Terminates the simulation, whenever the checker fails.
Calling the C function.
Writing a counter in C is so cool, but when do we increment the counter value? Well we need to monitor the change in the clock signal. (Note: By the way, it's normally a good idea to drive reset and clock from Verilog code.) Whenever the clock changes, the counter function needs to be executed. This can be achieved by using the routine below.
- Use acc_vcl_add routine, whose syntax can be found in Verilog PLI LRM.
acc_vcl_add routine basically allows us to monitor a list of signals, and whenever any of the monitor signals change, it calls the user defined function (called Consumer C routine). VCL routine has four arguments:
- Handle to the monitored object
- Consumer C routine to call when the object value changes
- String to be passed to the consumer C routine
- Predefined VCL flags: vcl_verilog_logic for logic monitoring vcl_verilog_strength for strength monitoring
acc_vcl_add(net, display_net, netname, vcl_verilog_logic);
Â
Let's look at the code below, before we go into details.
C Code – Basic
Counter_monitor is our C function, which will be called from the Verilog Testbench. As for any another C code, we need to include the header files specific for the application that we are developing. In our case we need to include the acc routines include files.
The access routine acc_initialize initializes the environment for access routines and must be called from your C-language application program before the program invokes any other access routines. Before exiting a C-language application program that calls access routines, it is necessary to also exit the access routine environment by calling acc_close at the end of the program.1 #include "acc_user.h"
2
3 handle clk ;
4 handle reset ;
5 handle enable ;
6 handle dut_count ;
7 void counter ();
8
9 void counter_monitor() {
10 acc_initialize();
11 clk = acc_handle_tfarg(1);
12 reset = acc_handle_tfarg(2);
13 enable = acc_handle_tfarg(3);
14 dut_count = acc_handle_tfarg(4);
15 acc_vcl_add(clk,counter,null,vcl_verilog_logic);
16 acc_close();
17 }
18
19 void counter () {
20 io_printf("Clock changed state\n");
21 }
To access the Verilog objects, we use a handle. A handle is a predefined data type that is a pointer to a specific object in the design hierarchy. Each handle conveys to access routines information about a unique instance of an accessible object; information is about the object type, plus how and where to find data about the object. But how do we pass specific object information to handle? Well we can do this in a number of ways, but for now, we will pass it from Verilog as parameters to $counter_monitor: these parameters can be accessed inside the C-program with the acc_handle_tfarg() routine. The argument is numbers as in the code.
So clk = acc_handle_tfarg(1) basically makes clk the handle to the first parameter passed; similarly we assign all the handles. Now we can add clk to the signal list that need to be monitored using the routine acc_vcl_add(clk,counter,null,vcl_verilog_logic). Here clk is the handle and counter is the user function to execute when clk changes.
The function counter() does not require any explanation, it is a simple "Hello world"-type code.
Verilog Code
Below is the code of the simple testbench for the counter example. We call the C-function using the syntax shown in the code below. If the object that's been passed is an instant, then it should be passed inside double quotes. Since all our objects are nets or wires, there is no need to pass them inside double quote.1 module counter_tb();
2 reg enable;
3 reg reset;
4 reg clk_reg;
5 wire clk;
6 wire [3:0] count;
7
8 initial begin
9 enable = 0;
10 clk_reg = 0;
11 reset = 0;
12 $display("%g , Asserting reset", $time);
13 #10 reset = 1;
14 #10 reset = 0;
15 $display ("%g, Asserting Enable", $time);
16 #10 enable = 1;
17 #55 enable = 0;
18 $display ("%g, Deasserting Enable", $time);
19 #1 $display ("%g, Terminating Simulator", $time);
20 #1 $finish;
21 end
22
23 always begin
24 #5 clk_reg = ! clk_reg;
25 end
26
27 assign clk = clk_reg;
28
29 initial begin
30 $counter_monitor (counter_tb.clk, counter_tb.reset,
31 counter_tb.enable, counter_tb.count);
32 end
33
34 counter U(
35 .clk (clk),
36 .reset (reset),
37 .enable (enable),
38 .count (count)
39 );
40
41 endmodule
Depending on the simulator in use, the compile and running phases varies. When you run the code above with the C code seen earlier you get the following output:
0 , Asserting resetClock changed stateClock changed stateClock changed state20, Asserting EnableClock changed stateClock changed stateClock changed stateClock changed stateClock changed stateClock changed stateClock changed stateClock changed stateClock changed stateClock changed stateClock changed stateClock changed stateClock changed state85, Deasserting EnableClock changed state86, Terminating SimulatorC Code – Full
So now that we see that our function gets called when there is a change in clock, we can write the counter code. But wait, there is a problem: every time the counter function exits, the local variables lose its value. There are a couple of ways we can preserve variables state.
- Declare the counter variable as global
- Use tf_setworkarea() and tf_getworkarea() routine to store and restore the values of the local variables.
Since we have only one variable, we can use the first solution. i.e. declare count as a global variable.
To write an equivalent model for the counter, the clock, reset, enable signals inputs are required to DUT and the output of the DUT count is required to the code checker. To read the values from the Verilog code, we have the PLI routine
acc_fetch_value(handle,"format")
But the value returned is a string, so we need to convert it to integer if a multi-bit vector signal is read using this routine. pli_conv is a function which does this conversion. The routine tf_dofinish() is used to terminate the simulation when DUT and TB count values do not match or, in other words, when a simulation mismatch occurs.1 #include "acc_user.h"
2
3 typedef char * string;
4 handle clk ;
5 handle reset ;
6 handle enable ;
7 handle dut_count ;
8 int count ;
9 int sim_time;
10 string high = "1";
11 void counter ();
12 int pli_conv (string in_string, int no_bits);
13
14 void counter_monitor() {
15 acc_initialize();
16 clk = acc_handle_tfarg(1);
17 reset = acc_handle_tfarg(2);
18 enable = acc_handle_tfarg(3);
19 dut_count = acc_handle_tfarg(4);
20 acc_vcl_add(clk,counter,null,vcl_verilog_logic);
21 acc_close();
22 }
23
24 void counter () {
25 p_acc_value value;
26 sim_time = tf_gettime();
27 string i_reset = acc_fetch_value(reset,"%b",value);
28 string i_enable = acc_fetch_value(enable,"%b",value);
29 string i_count = acc_fetch_value(dut_count,"%b",value);
30 string i_clk = acc_fetch_value(clk, "%b",value);
31 int size_in_bits= acc_fetch_size (dut_count);
32 int tb_count = 0;
33 // Counter function goes here
34 if (*i_reset == *high) {
35 count = 0;
36 io_printf("%d, dut_info : Counter is reset\n", sim_time);
37 }
38 else if ((*i_enable == *high) && (*i_clk == *high)) {
39 if ( count == 15 ) {
40 count = 0;
41 } else {
42 count = count + 1;
43 }
44 }
45 // Counter Checker function goes checker logic goes here
46 if ((*i_clk ! = *high) && (*i_reset ! = *high)) {
47 tb_count = pli_conv(i_count,size_in_bits);
48 if (tb_count ! = count) {
49 io_printf("%d, dut_error : Expect value %d, Got value %d\n",
50 sim_time, count, tb_count);
51 tf_dofinish();
52 } else {
53 io_printf("%d, dut_info : Expect value %d, Got value %d\n",
54 sim_time, count, tb_count);
55 }
56 }
57 }
58
59 // Multi-bit vector to integer conversion.
60 int pli_conv (string in_string, int no_bits) {
61 int conv = 0;
62 int i = 0;
63 int j = 0;
64 int bin = 0;
65 for ( i = no_bits-1; i >= 0; i = i - 1) {
66 if (*(in_string + i) == 49) {
67 bin = 1;
68 } else if (*(in_string + i) == 120) {
69 io_printf ("%d, Warning : X detected\n", sim_time);
70 bin = 0;
71 } else if (*(in_string + i) == 122) {
72 io_printf ("%d, Warning : Z detected\n", sim_time);
73 bin = 0;
74 } else {
75 bin = 0;
76 }
77 conv = conv + (1 << j)*bin;
78 j ++;
79 }
80 return conv;
81 }
82
You can compile and simulate the above code with the simulator you have as explained in the next paragraphs.
Linking With Simulator
We will link the counter example we saw, with the simulators below. If you want to see how to link with any other simulator, let me know.
- VCS
- Modelsim
VCS
With VCS simulator you need to create a tab file. For our example the tab file looks like this:
$counter_monitor call=counter_monitor acc=rw:*
Here $counter_monitor is the name of the user defined function that will be used in Verilog code, call=counter_monitor is the C function which will be called when $counter_monitor is called in Verilog. Acc=rw:* is telling that we are using access routines with read and write access to simulator internal data. :* means that this should be applicable to all modules in the design.
Modelsim
Like VCS, Modelsim simulator has its own way for communicating with PLI. We need to create a function listing all the user defined functions that will be referred to in Verilog and the corresponding C functions to call. Unlike VCS, we need to do it in the C file as shown below.1 #include "veriuser.h"
2 #include "pli_full_example.c"
3
4 s_tfcell veriusertfs[] = {
5 {usertask, 0, 0, 0, counter_monitor, 0, "$counter_monitor"},
6 {0} // last entry must be 0
7 };
vlib work
vlog pli_counter_tb.v counter.v
gcc -c -g -I$MODEL/include pli_full_example_modelsim.c
ld -shared -E -o pli_full_example.sl pli_full_example_modelsim.o
vsim -c counter_tb -pli pli_full_example.sl
In the vsim command line, type "run -all" to start the simulation.
 Refer to the Modelsim user guide for details or for how to compile and link in Windows.
Counter Simulation Output
0 , Asserting reset
10, dut_info : Counter is reset
15, dut_info : Counter is reset
20, Asserting Enable
20, dut_info : Expect value 0, Got value 0
30, dut_info : Expect value 0, Got value 0
40, dut_info : Expect value 1, Got value 1
50, dut_info : Expect value 2, Got value 2
60, dut_info : Expect value 3, Got value 3
70, dut_info : Expect value 4, Got value 4
80, dut_info : Expect value 5, Got value 5
85, Deasserting Enable
86, Terminating Simulator
Bạn Có Đam Mê Với Vi Mạch hay Nhúng - Bạn Muốn Trau Dồi Thêm Kĩ Năng
Mong Muốn Có Thêm Cơ Hội Trong Công Việc
Và Trở Thành Một Người Có Giá Trị Hơn
Bạn Chưa Biết Phương Thức Nào Nhanh Chóng Để Đạt Được Chúng
Hãy Để Chúng Tôi Hỗ Trợ Cho Bạn. SEMICON